
We will work with most any material which can be cut well by CNC router and which does not require coolant. This includes any urethane foam, some other plastic foams, acrylic, wood, even bronze. Most of our models are cut from urethane foam because it is lighter, easier to handle and easier to finish in a variety of ways. Please refer to our companion venture www.Vermont-carving.com for a look at our new and expanding line of wood models.
Certainly – this is not unusual. You might be surprised, however, how easily your clients would appreciate the value of specialization these days. This is especially true with almost everyone using fax, e-mail and overnight delivery services. A lot of architectural model builders find that they don’t use their “foam carving machine” often enough, and they are delighted to be able to reclaim the space and keep their shop much cleaner. [Very few people require that their home or office be constructed by a “full service” builder. Just think of us as “the bulldozer guys.”]
-
Is your shop computerized? Yes. In 2002, Landfoam acquired its first Thermwood CNC router, with capacity to 60″ x 96″ x 9″, with motion up to 2000 ipm. We have since acquired a second new Thermwood, with capacity 64″ x 120″ x 9.” These routers are top quality industrial machinery – which can run 24 hours a day to produce your shapes. When information is sketchy, however, it is likely that our manual methods may remain most appropriate. At Landfoam you get the method which matches the project needs most closely.
-
Smooth models can be defined in various ways, including 3D meshes (such as .STL, .3DS, or .DXF) and XYZ grids (of various formats, including generic ascii). For stepped models, it is important to have relatively high quality contour lines in DWG or DXF format (not complicated by XREF’s, numerous breaks, and/or large quantities of extraneous data). For stepped models, it is not necessary for lines to be “elevated,” since we take care of that operation.
-
Our software can also superimpose two-dimensional information and cut it at the appropriate level. – as for engraved lines or recessed features. This is often helpful to accurately locate fine details – such as lot lines, sidewalks, paving patterns, or even surveyed trees. We can use cutting tools as fine as .010″ for special features.
-
In addition, the CNC router allows us to machine a wider range of materials. It will probably be a while, however, before it is competitive with our manual methods of producing complex one-of-a-kind landscape models which are not well documented in digital form.
-
Do you make those “laser” models? No. Except for relatively small-format (and expensive) 3D machines, laser technology is primarily limited to 2D cutting.
We used to say we only painted one general color. This has been changed by new technology. We now offer a new and unique method we call “Machined Masking.”. This means that we will “finish cut” one portion of a model (most often the road pattern) and paint it a color of your choice prior to finish cutting the remainder of the model. When our router cuts the remainder of the model, it will remove unwanted paint and only leave paint in the designated areas. At this stage the model may be suitable as a “study model” with contours cut, roads painted, buildings excavated and sidewalks “engraved” or “scored.” This is especially true if the material you select a foam color which does not need to be painted (perhaps our gray 18 lb/cf foam or our brown 15 lb/cf foam). Some clients may prefer to add a final general “misting” or “wash” to modify the overall color, without hiding the road color entirely. If we apply this general tint, then we also have the option of cutting certain areas away to remove the raw foam – as to show a fine pattern of paths.
Since we are specialists “to the trade,” we provide an “unfinished” product which generally requires additional work. The nature of this additional work can only be determined by someone who knows the overall needs of the project – including the purpose of the model and the way in which it is to be displayed and viewed . People who do not normally fabricate models would probably be wise to involve or at least consult a full service model maker.
Upon special request, we sometimes mount our foam models on a rigid substrate, such as MDF. While this may be a convenient low-cost alternative for the handling of a foam model, it should not be viewed as a permanent display base. Except for small models, we recommend an additional structural frame to support an MDF-based model and to stabilize it against bowing or bending. This frame might include an outer rail for mechanical protection and as a means to support an acrylic cover. Even models which are properly mounted and framed should not be crated in a way which allows them to be inverted and dropped during shipment, because this could fracture the bonds between model and base, causing serious damage.
Any paint. No ordinary coating will damage the foam and we’ve heard good reports on all kinds of paint. The only warnings we’ve heard pertain to models which people coated with relatively thick coatings of epoxy or urethane. It seems that coating shrinkage can cause cracking (and even warp a model).
If your data can be communicated with a .dwg or .dxf, the best first step would probably be to send a copy, along with a description of the model you desire, to nk@landfoam.com. If the file is over 2MB, please call to discuss using our ftp site.
For manually produced models, the ideal would be to send us a set of drawings at the scale of the model. If schedule or convenience requires, however, we can work with sketches and/or description, by voice, fax or e-mail. The key information is the plan dimensions, the scale, the step required, the amount of relief, and some description of the complexity. You can reach us by:
voice: 1 802 728 7098
fax: 1 802 728 7099
mail: Landfoam North
#6341 VT Rte. 12A
Braintree, VT
USA
e-mail: nk@landfoam.com
Please note that now that we have two shops to serve you, the computerized models are likely to be fabricated at our Somerville, Massachusetts shop – Landfoam Models Inc. (LMI). The handmade models and some of the computer fabricated models will be produced by Landfoam North, in Vermont.
-
Is your shop computerized? Yes. In 2002, Landfoam acquired its first Thermwood CNC router, with capacity to 60″ x 96″ x 9″, with motion up to 2000 ipm. We have since acquired a second new Thermwood, with capacity 64″ x 120″ x 9.” These routers are top quality industrial machinery – which can run 24 hours a day to produce your shapes. When information is sketchy, however, it is likely that our manual methods may remain most appropriate. At Landfoam you get the method which matches the project needs most closely.
-
Smooth models can be defined in various ways, including 3D meshes (such as .STL, .3DS, or .DXF) and XYZ grids (of various formats, including generic ascii). For stepped models, it is important to have relatively high quality contour lines in DWG or DXF format (not complicated by XREF’s, numerous breaks, and/or large quantities of extraneous data). For stepped models, it is not necessary for lines to be “elevated,” since we take care of that operation.
-
Our software can also superimpose two-dimensional information and cut it at the appropriate level. – as for engraved lines or recessed features. This is often helpful to accurately locate fine details – such as lot lines, sidewalks, paving patterns, or even surveyed trees. We can use cutting tools as fine as .010″ for special features.
-
In addition, the CNC router allows us to machine a wider range of materials. It will probably be a while, however, before it is competitive with our manual methods of producing complex one-of-a-kind landscape models which are not well documented in digital form.
-
Do you make those “laser” models? No. Except for relatively small-format (and expensive) 3D machines, laser technology is primarily limited to 2D cutting.
A. For hand-made models:
If the scale is larger than 1″ = 100′, we can delineate the roads by “depressing” them. Take a close look at our road option illustration below (the second version takes more time to load better detail). If you’d like to show roads this way, you don’t have to worry about whether the contour drawing shows the proper “curb jogs,” just specify the increment by which you want the road lowered and we’ll do the rest. For example, on a gently sloped model which at 1″ = 50′, we might cut contours at 1′ intervals (.020″) and depress the road by the same amount. On a model which is 1″ = 20′, for example, we might cut steps at 1′ interval (.050″) and depress the road by 6″ (.025″). This can be quite helpful, no matter whether you like one-color models, or you want to use the surface information to ease the hand painting or the masking of a road pattern. [Another option, especially for scales smaller than 1″ = 20′, is to have us simplify the contour pattern so that there are no “curb jogs” – with contours just crossing paved areas which are to be shown with paint color.]


44″ x 77″ @ scale of 1:1000
typical contour step: 1m (=1mm on model)
road “depression:” 0.5m (=0.5mm on model)
B. For computer-made models:
We can provide even more detail if we use our CNC router – by “lowering” areas such as roads, and/or by “engraving” lines, such as property lines and path layouts. For adding detailed information, we use very fine cutting tools – most commonly .016″ diameter tool.
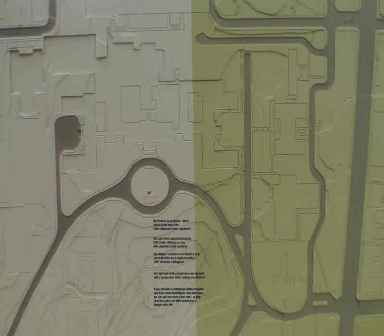
Our new 2010 painting option, illustrated above, is accomplished by careful coordination of painting and cutting. First, we “finishcut” designated areas with the CNC router. Then, we paint the model with any specified color. After painting, we finishcut the remainder of the model so as to remove excess paint and foam, down to the final surface. Upon completion of this step, we can add a light coat of another color or ship the model off to you. If you work with us on color selection, we can extend this method to even include another color for another feature – perhaps paths.
This new option can be used in various ways, depending on your project and your color preferences. For instance the paths could be one shade of gray, the roads could be a darkened shade and the landscape could have a greenish tint added. In the sample shown above, an alternative for the right hand side would be to outline the paths and then just barely “depress” them with a 1/32″ diameter cutting tool so as to reveal the natural gray color of the foam.
I haven’t painted much foam. Do you have any painting tips to offer?
Here are some tips on one way to paint a foam base without worrying about spray equipment and professional painting skills. [We don’t presume to offer advice to experienced painters – they should be able to adapt their methods without much difficulty.]
Recommended Tools:
- 2″ brush for applying paint
- 4″ brush for removing excess (optional tool to quickly remove excess)
- newspaper or “spinner” with which to dry 4″ brush
- good lighting
Step One:
Apply paint in normal fashion, starting at one corner and only covering about 2 – 4 square feet at a time. Use enough paint so that you can be sure to cover all the contour edges without taking so much time the paint starts to dry. If you’re planning on a single coat, you need to be very careful to inspect for “holidays,” especially at the contour edges.

Step Two:
Use the 4″ brush to remove excess paint. A “stippling dry brush” method is ideal because it picks up the paint and avoids leaving ordinary brush strokes marks. Just lightly “tap” the model repeatedly with the bristles until it seems that they aren’t picking up any more paint. Then spin the brush dry (into a bucket) or wipe it off on a newspaper.

Continuation:
When this section of the model is cleared of excess, apply more paint so as to advance the “wet edge” of painted area. Unless you plan on putting on several coats and filling in most of the texture with paint, you should avoid letting the leading “wet edge” of the paint dry before applying more paint. [The overlap of new paint on top of dried paint would create a band with slightly reduced texture because it effectively receives an extra, unintended, coat of paint. If you experience this, however, you can reduce and/or eliminate it by applying one or more additional coats, thereby reducing the texture everywhere.]
One method to extend “working time,” is to do your painting in a closed room equipped with a humidifier, which will slow the drying of the paint. Another option is to use alkyd paint.
Coats:
If you want to preserve the foam texture as much as practical, one coat will probably be enough. If you want to obscure the texture, you may want to dry the model quickly with a fan and proceed with one or two more coats. After three coats, you’ll probably notice that the change in appearance is less and less with each coat.
The 8 lb/cf foam does not require heavy painting for protection from normal handling. One reason for applying more than one coat, however, is to produce a surface on which you can paint details such as paths and then “paint them out” and paint on revised details. [A path on lightly painted foam is harder to obscure because each coat reduces the texture a significant amount.]
Completion:
Before leaving the paint to dry, Take a close look for brush hairs or paint impurities. They can be removed more easily at this point than after the paint dries.

(74k bytes)
30″ x 48″ x 6″
1″ = 40′
2′ steps = .050″
roads depressed 1′ = .025″
Roads and Paths:
The illustration above shows a study model on which the roads are delineated by .025″ depression below adjacent areas. Although this is sufficient for some studies, it’s practical for a patient person with a reasonably steady hand to paint the roads with a small brush and a single coat of full-bodied latex paint. Since paths are rarely depressed at this scale, it would be necessary to draw them lightly with a pencil before painting. A “study” alternative would be two apply “graphic tape” of the proper width to diagram paths.
Note on color:
The porous nature of the foam creates a pattern of dark “cell shadows.” When the model is lightly painted, this tends to render the finished model a shade darker than one might expect from a paint chip, or an untextured sample. More coats fill in more cells and tend to reduce this darkening. In order to produce a “pure white” model, one would have to fill in all the pores – a task which is quite difficult on a stepped model. If color is critical, an experimental sample is highly recommended.
Spray Alternatives:
You can certainly use aerosol spray paints on polyurethane foam, including fast-drying lacquers. The most important thing is to protect yourself from the fumes. Beyond that, the masking can be challenging, but we’ll try to pass along some tips on simplified (“nonprofessional”) masking methods when we get a chance.
We haven’t found anything to indicate that the dust is more hazardous than ordinary environmental and shop dust, which should be avoided.
It is produced with a fire retardant ingredient. This reduces the hazard to a low level for most model installations. Certain applications, such as a large foam model which is wall-mounted in a public space, should be studied carefully to determine if the surface coating provides additional protection from ignition.
First, no ordinary glue will damage the foam itself. Since the foam is “closed cell,” it would be hard to predict the speed with which air-drying adhesives will solidify. Due also to the general need for “gap filling,” capability we most often recommend two-part liquid epoxy, selected so that you have enough working time. Contact adhesives are also acceptable under some circumstances, but you may need an extra coat on the foam side, and you should avoid joining rigid components unless they have large contact areas (without forced bending). [An obvious warning is to avoid letting an adhesive get on a surface which is to be exposed – unless it doesn’t matter that the texture is changed by cell filling.]
This pertains to handmade models. First, we produce sanded models with very fine contour intervals (except at steep sections) in order to minimize “stair stepping” and reduce sanding. Second, we mill the large flat areas one step lower than the drawing shows – in order to compensate for the fact that they will not be sanded down Our computerized models are cut according to a virtual model surface which is created and sometimes “sculpted” by computer prior to cutting.
The 8lb/cf foam is easy to cut with ordinary woodworking and carving tools, including your Exacto #11. It’s also good to sand. Denser foams get progressively more difficult to make large cuts.
This would depend mostly on the purpose of the model, on the scale, and on the amount of relief across the model. If the relief is less than 2″ (50 mm) or a detailed building model will be installed, you are likely to prefer fine contour, maybe .020″ – .040″ (0.5 – 1.0 mm). If the model is deeper than three inches, or if it’s just for “massing” study, contours of .60″ – .10″ may be acceptable. In selecting a contour interval, keep in mind the following general tendencies:
- finer contours (and sanding) tend to diminish apparent depth of relief
- coarse contours dramatize relief
- the reduced drama of fine contours is less likely to draw attention from featured architecture
- sanded sites seem more “realistic” than stepped sites, but make it harder to “read” the shape
- contour interval and building model detail are related, avoid finely detailed buildings on coarsely contoured sites
Yes. We produce these in two alternative ways: by CNC router – or by milling a stepped model and then sanding it smooth. The determining factor is often the quality of the contour data. If it is good, the relief can be milled to a smooth surface and then line information can be engraved over the undulating surface, according to a 2D vector file. For example, paths, roads and property lines could be engraved with a cutting tool of .016 diameter, to a depth of .01″ . If you are preparing a 3D model for machining (as by STL file), please note that it is generally best to leave as many discontinuities (especially building excavations and road curbs) out of the virtual model. Please provide continuous lines to define such discontinuities. We would “drape” this information over the virtual model and cut the defined areas as specified.
No. We certainly recommend checking the drawings to avoid serious errors, omissions and ambiguities. We produce a “shop drawing” prior to milling. This helps us work out problems with our clients, often with the help of faxed inquiries and clarifications. For computerized models, it is generally necessary for the client to provide drawings which are suitable, because we do not have the staff required to edit and refine your drawings quickly enough to meet most schedules.
Requirements for computer-cut models vary according to whether you want smooth or stepped finish. In either case, we can work with several surface formats which you might provide.
This is one advantage of manually guided machinery. It facilitates addition of interpolated contours. It would be good, however, if you check for special conditions, such as entries and terraces, where you may want to provide spot elevations to guide interpolation. Addition of interpolated contours is a more complex issue for computer produced models, so we would need to study the individual situations.
We provide “rough excavations” to whatever depth you request. We generally recommend cutting to the “lowest adjacent grade” and leaving a little foam “trim margin.” When good CAD data allows, our CNC router produced models can be cut with accurate building footprints, or with a setback which you specify. The corners of the footprints will be radiused due to our round cutting tool but can be “squared out” with chisel or blade.
It depends on the terrain adn the scale. In some cases, it’s helpful to help people understand the shapes. It can produce confusion, however, especially relative to truly scaled buildings and trees. The larger the scale of the model, the less likely you are to need exaggeration. For instance,in some cases, a model at 1:5,000 metric scale might well be exaggerated 200% but a model of 1″=20′ is generally better to produce at true scale.
If you can define the area of special interest, we can provide interchangeable inserts. If you must study the model first, you can ship it back to us and have us cut a hole and fit it with one or more inserts.
The models can be carved or sanded. Although we can provide limited quantities of thinly cut foam so that you can make small laminated additions, we would only recommend it in very unusual circumstances. If significant “bulldozer work” is required you might consider using the foam as a substrate, upon which you model with clay. Alternatively, you could return the model (by prior arrangement) and have us cut one or more “inserts.”
We build them up from layers of three and four inch thick foam. This reduces material cost, reduces tool-clearance problems, and avoids warpage due to the internal stresses that are often present in blocks of foam. Furthermore, we don’t know of a manufacturer which routinely provides foam blocks to the maximum size of our models. We conceal our glue by “inlaying” or “pocketing” each upper layer in the layer below it.
Yes, but they can be quite inconspicuous. On stepped models, we put the lamination at a step. On smooth models, we use our CNC router to cut a “pocket” into which we “inlay” the upper layer. This inlaid lamination eliminates the “feathered glue joint” which used to be impractical to avoid on most deep handmade models.
We only stock material which is 48″ x 96″, so that is a good size to remember. When appropriate, however, our new Thermwood can cut individual sections up to 60″ by 120,” . Our largest model to date was about 18′ by 24′ and our deepest model about 36″ deep. Single pieces in excess of 48″ x 96″ (which are not glued together) require additional time for special order materials.
If you need a fine finished model, we recommend that you contact a model maker who can provide a fully coordinated product. Ideally, this would involve one of our landform bases. If you only need a simple site model, or a study model, we’d be delighted to provide one directly to you. If you like, this could include colored roads and engraved paths, with a handsome choice of background foam color.
If the data is in good digital format, we our CNC router gives us the most options for showing paths. Most simply, path lines can be delineated by “engraving” or “scoring” with a fine cutting tool, perhaps 1/64″ diameter. This outlining may delineate the paths well enough or it will be a big help in locating the paths so that you can paint them with a fine brush or mask and spray them.
If the paths are outlined with a good continuous polyline, we can “depress” them very slightly as we often depress roads. This method also gives us the option of differentiating the paths with color. If you like, we can either depress the paths very slightly so as to reveal the natural foam color after painting is finished, or we can add an additional color tint so that roads paths and land all have a different color.
If the scale is large enough, such as 1/20″ = 1′ or larger, we can treat the paths as small “roads” and depress them whether or not we use our CNC router. The manual method does not allow for detailed painting.
In the case of models we cut by computerized router, we can “drape” vector data from a separate 2D file which you provide. This allows us to”engrave” (“score”) such information with an appropriate cutting tool. For handmade models, we can mark important corners with a “pencil twirl” (or a push pin) in the foam. You would have to connect the dots.
We can perform some “smoothing” without any problem. Completely eliminating that “style” may increase our labor charge, depending on the extent of revision necessary.
When the complexity is clearly irrelevant to the use of the model (and only adds “visual noise”) we try to reduce it a reasonable amount. We don’t get involved in much of this editing when we are producing computerized models, unless specifically requested and planned.
When specifically requested, we try to roughly balance cut and fill in a way to keep grades to realistic limits – such as 5% for parking and 10% for roads. Note that such contours would be approximated – only intended for better conceptual illustration, done without detailed analysis. This is generally more practical for manually cut models than for computerized models.
Although you can’t simply push fine “weed” trees into the foam, it’s pretty simple to push a wire of the proper diameter into the foam, in order to prepare a hole.
Certainly. Just schedule your visit by calling in advance, please.
As suppliers, we are not in a position to know or to judge such intangibles as reliability, economy and cooperation. We can only see the end result – and let that speak for itself. For that reason we do not want to be held responsible for the future performance of any company but our own. If we learn that our landform isn’t well used for the intended purpose (from quick study model to fine museum exhibit), we’ll avoid promoting the offender.
For the first model, we require a 50% retainer and the balance COD. After that we can gradually relax the terms toward 33% retainer and the balance in thirty days.
With our “repeat” customers, we discount our charges according to the volume of business they give us.
Generally not. Although we certainly prefer good computerized data or an easy-to-read print, we often prepare a “shop drawing” from information which is not well digitized. At this stage we can usually figure out the intent of the drawing – and, if necessary, telephone, fax or e-mail our questions for your clarification. The important thing is for you to be sure that your plan is not misleading enough to cause us to make the wrong assumptions and interpretations. Only you know the purpose of the model, so only you can judge the degree of control which is appropriate to exercise over the details of the landform. Unfortunately, there’s no denying that bad drawings can cause problems which we might not be able to avoid. Our manually guided machinery is generally the best option for cutting models from “challenging” drawings.
We produce most models in a week or less and ship them by overnight or two-day express. Small models can often be produced in a day or two. Large, multi-section models are likely to take more than a week. With three large machines available, we can generally adapt to most any schedule.
Our charge is based on the time and materials, which are determined mainly by two factors: the overall, bounding-rectangular, volume of the model (not the “net” volume) and the complexity of the model shape. Once you know the size and contour “step” you require, the following guidelines should help provide a preliminary “order of magnitude” estimate:
- In brief summary, models usually cost between $300 and $600 per cubic foot of overall volume. This assumes our 8lb/cf foam, wood crate and delivery.
- Our “average” model costs about $500 per cubic foot of gross overall volume. [Example: 30″ x 40″ x 2.5″ overall, with about fifty steps cut at .040″ each – costs under $900, delivered. Multiply dimensions 30″x40″x2.5″ and divide by 1728 in3/ft3 to calculate overall volume of 1.74ft3. Then, multiply 1.74 ft3 by $500/ ft3 to arrive at an estimated budget amount of $870]
- At one extreme, models which are “large” (over ten cubic feet gross overall volume and over 3″ deep) and “simple” (with “bold” contours – steps deeper than 0.100″) sometimes cost as little as $100 per cubic foot, delivered.
- At the other extreme, models which are “small” (under two cubic feet gross overall volume) and complex (with “fine” contours – steps between .020″ and .030″ depth, or “sanded smooth”) are not likely to cost more than $600 per cubic foot of gross overall volume, delivered.
- This is US currency and includes domestic delivery. These guidelines do not apply to models under two square feet in overall plan area, under 2″ in overall depth, with exaggerated vertical scale, with unusually fine detail, or with illegible drawings. These estimates do not include sales taxes which may be applicable.
- CAD work can add to these costs, depending on the quality of the data which is available
- Painting is additional according to how many colors and how much detail is required. A rough preliminary estimate of painting cost is $10-15 /sf (gross model area in plan view) for each paint color specified.
Please don’t hesitate to contact us for more guidance and help in your planning.
Our standard foam is 8 lb/cf polyurethane, custom “foamed” by the manufacturer. We believe this density and special foaming procedure provides for the best model appearance, with a good balance between durability and weight. The higher density is especially important if you’re not planning on special model protection or on casting a reinforced copy. The polyurethane formula is ideal for a variety of finish techniques, unlike expanded polystyrene foam. Please note that the natural color of the foam varies due to the chemistry of foaming. This foam color will generally vary within a model and also change slightly when exposed to ultraviolet light. [Lighter foams cost less but look coarser and require more protection.] If you want more uniform and predictable color, we recommend that the foam be painted.
Our computerized machinery has made it possible to use a wider range of materials, including dense foams and acrylic (pretty much any machinable material which does not require coolant). Particularly appealing to some designers is our 18 lb/cf foam, which will provide a model which looks almost like it’s cut from a solid block of greenish-grey chipboard.
Just phone, write, or e-mail, being sure to include your name and address. No charge if ordinary US Postal Service delivery is acceptable. If you are in a rush, with your account number, we’ll FedEx a sample “overnight.” Our samples are generally 8lb/cf except by special request.